

How to Prepare Your Home for Outdoor Blind Installation: The 2026 Checklist
A botched installation is more than just a headache; it's a wasted investment that can compromise your home's structural integrity and your 10-year warranty. You've likely spent weeks choosing the perfect outdoor zip blinds, and now the fear of unexpected delays or damaged decking is starting to set in. Learning how to prepare your home for outdoor blind installation is the only way to transform that anxiety into total confidence. We know you want a professional result without the mess, and getting the site ready is the most important step you can take.
Follow this comprehensive 2026 checklist to ensure a seamless, stress-free installation that works perfectly the first time. We'll walk you through the essential steps, from verifying NCC 2025 fire safety compliance to clearing the work area for our team. You'll learn how to handle electrical requirements for motorised options and what documentation you need for local council approvals. By the end of this guide, you'll be ready for a clean, efficient install that secures your home's comfort and privacy for the long term.
Key Takeaways
- Verify the structural integrity of your timber or aluminium posts to ensure they can handle the specific tension requirements of outdoor zip blinds.
- Learn exactly how to prepare your home for outdoor blind installation by establishing a two-metre clear zone for our expert installers to work efficiently.
- Determine your power preferences early by choosing between hardwired motors or solar-powered alternatives for your motorised blinds.
- Protect your outdoor kitchen and BBQ area from drilling dust while ensuring all mounting surfaces are free of debris and cobwebs.
- Understand the factory-direct installation process and why verifying measurements on the day is critical for a perfect, long-lasting fit.
Structural Assessment: Is Your Alfresco Area Ready for Zip Blinds?
Zip blinds are a high-performance upgrade for any home. They don't just hang loosely like traditional roller shades. These systems use side tracks to create a tensioned, wind-resistant barrier. This tension places significant lateral pressure on your posts and beams. If your structure isn't stable, your blinds won't operate smoothly. Understanding how to prepare your home for outdoor blind installation starts with a rigorous structural audit. You want a result that looks perfect and lasts for a decade.
A weak foundation leads to track misalignment. This causes the fabric to bunch or the motor to burn out early. Unlike basic Awning types and materials, zip-track systems require precision. Every millimetre counts. If your alfresco area has decorative cornices or protruding lintels, these must be addressed now. You cannot install a straight track over a curved or uneven surface.
Checking Posts and Lintels for Stability
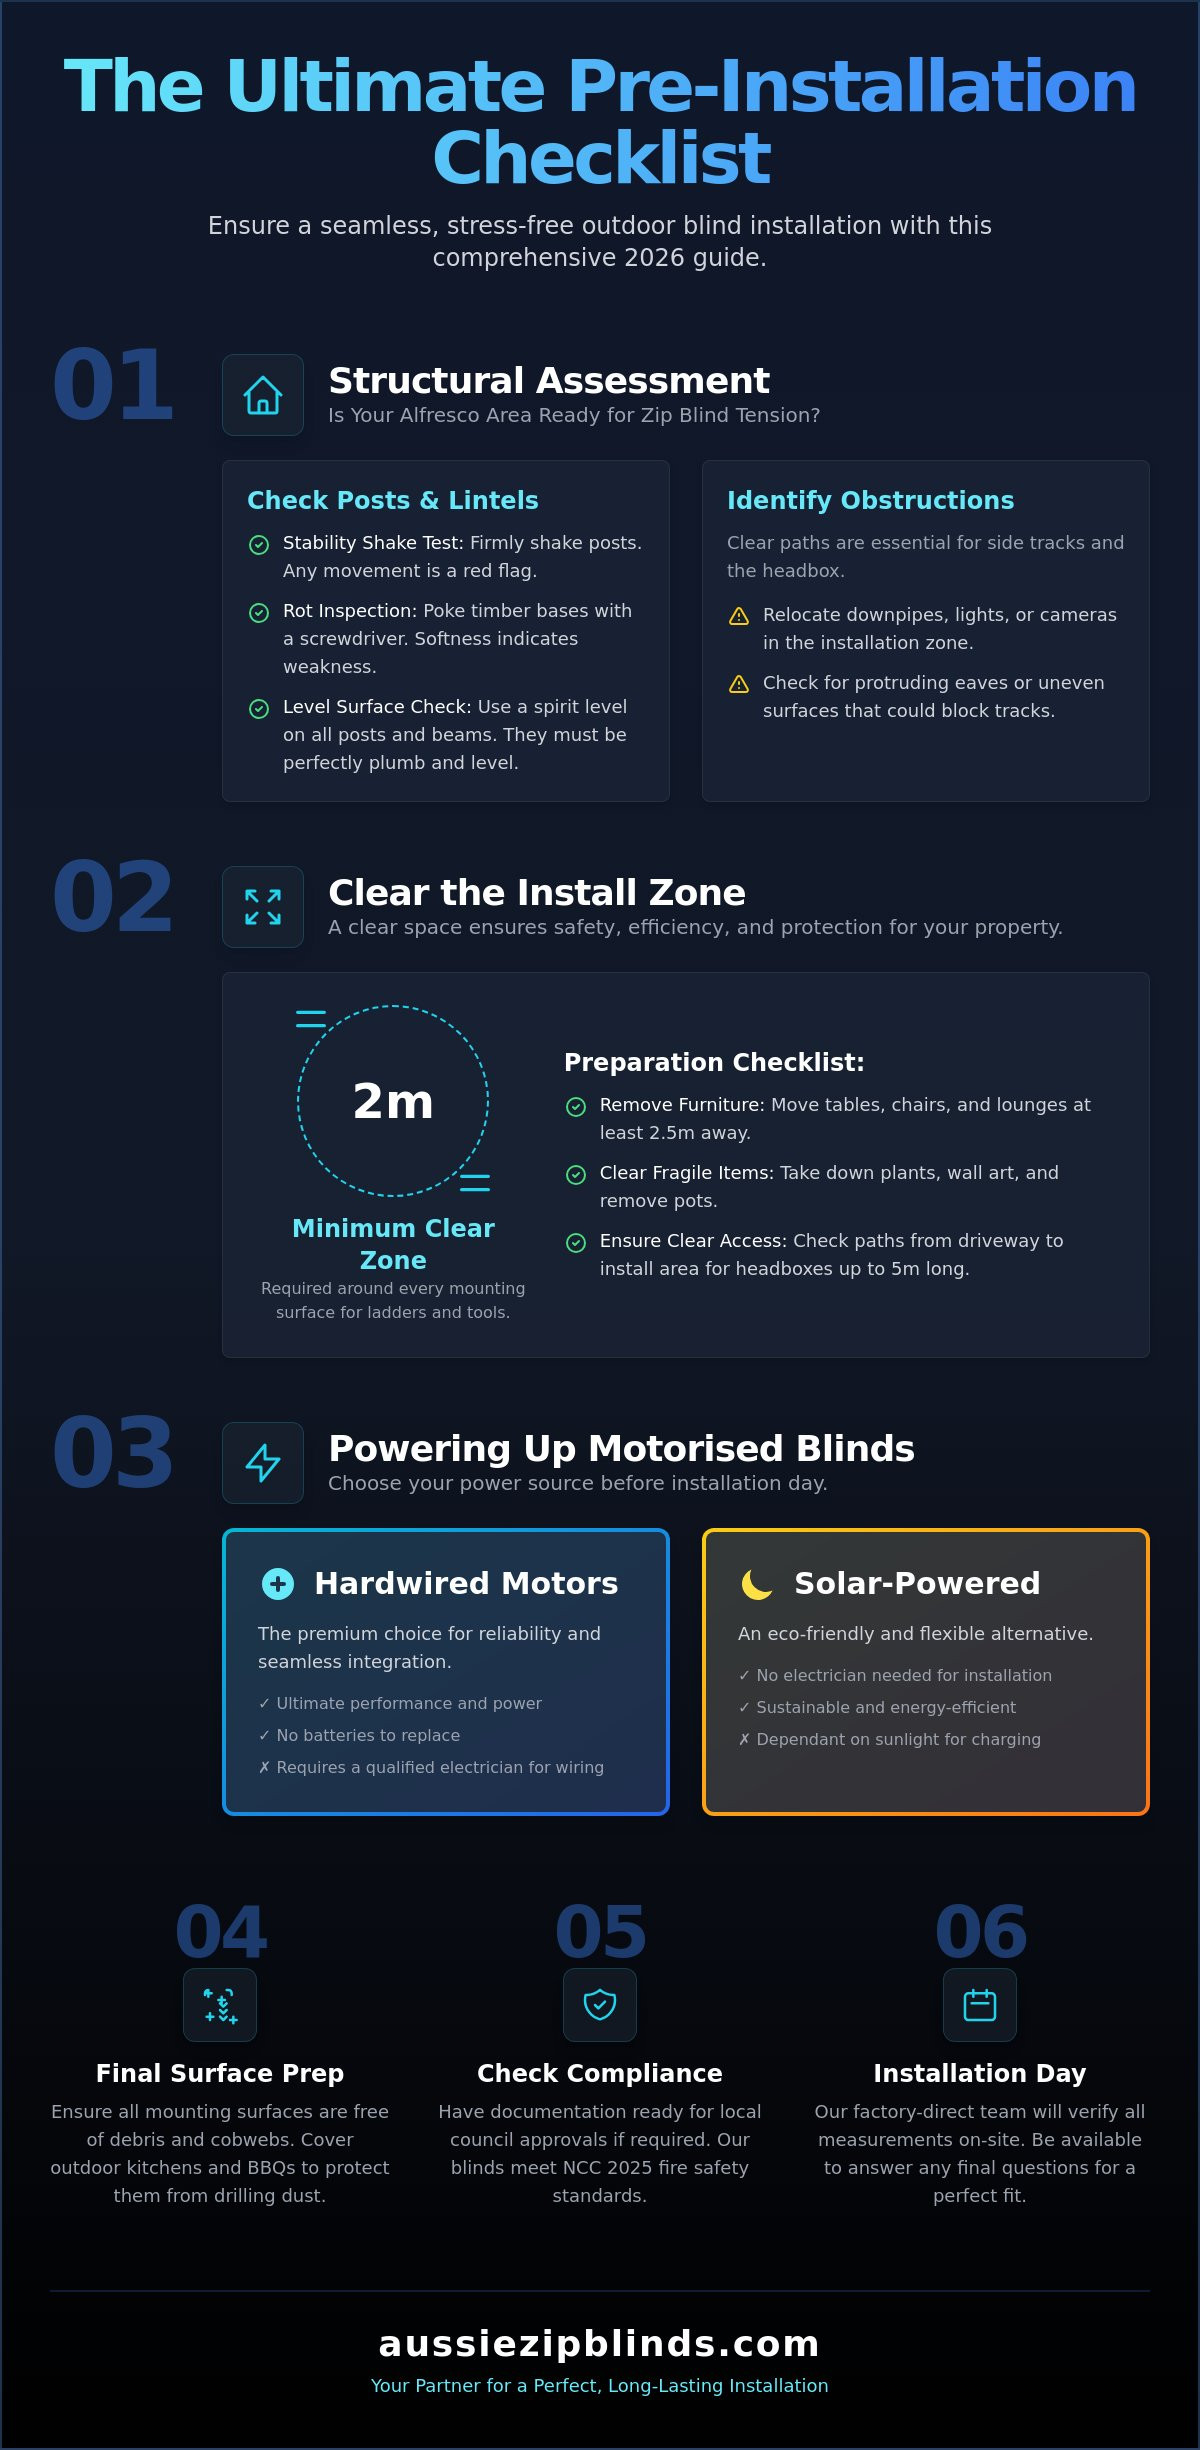
Your posts are the backbone of the installation. Verify that every timber or aluminium post is securely anchored to the concrete footings or the deck frame. Give them a firm shake. Any movement is a red flag. For older timber structures, inspect the base and joinery for rot. Use a screwdriver to poke the wood; if it's soft, the mounting screws will eventually pull out.
- Ensure the top mounting beam can support the weight of the aluminium headbox.
- Check for sagging in long horizontal spans.
- Use a standard spirit level to verify all mounting surfaces.
- Place the level against the post; the bubble must be perfectly centered for the tracks to run plumb.
Identifying Obstructions: Downpipes and Drip Lines
Clear paths are essential for the side tracks. Downpipes often sit in the corners where zip blinds need to be mounted. You may need to relocate these pipes or use spacers to bypass them. Check your outdoor lighting, GPOs, and security cameras. If they sit within the install zone, move them before the team arrives. Protruding house eaves or gutters can also block the headbox.
Look at the roof drip line above your patio. Water should shed away from the mounting area. If rain pools behind the blind headbox, it will cause long-term debris buildup and track corrosion. A clean, unobstructed area ensures our factory-direct team can work efficiently. This is a critical part of how to prepare your home for outdoor blind installation to avoid costly delays. If you have questions about specific structural challenges, contact us for expert advice before you begin.
Clearing the Install Zone: A Step-by-Step Space Checklist
Efficiency on installation day depends on a clear workspace. Our team needs a minimum 2-metre "clear zone" around every mounting surface. This space allows for safe ladder placement, tool access, and the unhindered movement of our installers. When you understand how to prepare your home for outdoor blind installation, you eliminate the risk of accidental damage to your property. A cramped workspace leads to delays and safety hazards. If you are installing alfresco blinds on tight Bayside balconies, space management is even more critical. Every centimetre of floor space counts when handling high-tension track systems.
Access routes are just as important as the installation zone itself. Our installers often carry headboxes that exceed 5 metres in length. Ensure there is a straight, unobstructed path from your driveway to the alfresco area. Check for narrow side gates, low-hanging branches, or tight corners that might block the way. If your balcony is only accessible via stairs, please let us know in advance. If you're unsure if your balcony has enough clearance, speak with our installation experts for a quick assessment.
Removing Furniture and Fragile Items
Don't just cover your furniture; move it. Drilling into masonry or timber creates fine dust that can settle into chair cushions or BBQ grates. While we take every precaution, removing items is the only way to guarantee they stay clean. Move heavy dining tables and lounge sets at least 2.5 metres away from the wall. This gives our team the freedom to move ladders without constant repositioning.
- Take down hanging plants, wind chimes, and wall art.
- Remove any fragile glass decor or ceramic pots from the vicinity.
- Cover built-in outdoor kitchens or BBQs with heavy-duty drop cloths to catch drilling debris.
- Clear any rugs or mats that could create a trip hazard for installers carrying heavy components.
Managing Pets and Children on Install Day
Safety is our absolute priority. An installation site is a busy environment with active power tools and heavy aluminium components. Keep pets indoors or off-site for the duration of the work. A curious dog under a ladder is a major safety risk for both the animal and the installer. Children should also remain clear of the "no-go" zone until the final screw is in place.
Educate your family about the dangers of the work area. Power cables and drilling equipment require full attention from our team. Following how to prepare your home for outdoor blind installation includes ensuring no one enters the workspace unexpectedly. For more information on maintaining a safe environment during home improvements, refer to these Outdoor electrical safety guidelines. By keeping the area clear, you ensure a faster, safer, and more professional result for your home.
Powering Up: Preparing for Motorised Outdoor Blinds
Motorisation provides the ultimate convenience for your outdoor living space. It also introduces specific technical requirements that must be handled before our team arrives. Most homeowners underestimate the electrical preparation needed for a seamless finish. If you want a clean look without visible cables, planning your power source is non-negotiable. This stage is a critical component of how to prepare your home for outdoor blind installation. Proper coordination between your electrician and our installers prevents delays and ensures your 10-year warranty remains fully protected.
A common mistake is assuming a standard indoor power point is sufficient. Outdoor zip blinds require dedicated, weather-protected power sources. If you don't have an existing external General Purpose Outlet (GPO), you must consult a licensed electrician. We cannot perform electrical wiring beyond the standard plug-and-play connection. Having your power ready means our team can test the motor limits and smart home integration immediately after the blind is mounted.
Electrical Point Placement and Wiring
Location is everything. You need the power source situated on the same side as the motor, which is typically confirmed during your initial quote. Don't leave this to chance. Ensure all outdoor sockets carry a minimum IP66 weather rating to withstand the harsh Melbourne climate and coastal salt spray. This rating guarantees the outlet is dust-tight and protected against powerful water jets.
- Consult your electrician about "concealed wiring" to hide cables inside the wall cavity or ceiling.
- If internal access is limited, use high-quality, surface-mounted conduits that match your home's exterior.
- Standard blind motors are highly efficient; they typically require a dedicated circuit with an amperage draw of less than 2 amps per motor.
- Verify that your GPO is easily accessible for future maintenance but hidden enough to maintain a sleek aesthetic.
Solar-Powered vs. Hardwired Options
Hardwired motors are the industry standard for reliability and performance. They provide consistent power and integrate flawlessly with smart home hubs and voice-activated systems. If you plan to control your blinds via a smartphone app, hardwired is the superior choice. However, solar-powered zip blinds are an excellent alternative for Mornington Peninsula homes where running new electrical cables through solid masonry is too difficult.
Solar systems rely on a small photovoltaic panel mounted on the headbox. You must check for sun exposure before committing to this option. A south-facing alfresco area or a spot under heavy tree cover may not provide enough charge for daily operation. Battery-backed motors in solar units offer some leeway, but they still require regular UV contact to stay functional. If you are leaning towards smart home integration, test your outdoor Wi-Fi signal strength at the installation site. A weak signal will cause lag in motorised response times. For specific technical data to provide to your electrician, contact our support team today.
Final Surface Preparation and Cleaning
A clean workspace is a professional workspace. When you're figuring out how to prepare your home for outdoor blind installation, don't overlook the actual mounting surfaces. Drilling into layers of dust, cobwebs, or old bird droppings creates a mess that can get trapped inside the new aluminium tracks. This debris eventually grinds against the zip mechanism, causing premature wear and annoying squeaks. You want your installation to be pristine from the second our team leaves. Starting with a sterile surface is the only way to ensure long-term track health.
Coastal homes in the Bayside area face unique challenges. Salt spray residue builds up on brickwork and timber very quickly. This salty film can react with metal shavings during the drilling process, leading to unsightly staining or corrosion if not cleared away. A quick, thorough clean of the installation perimeter ensures a better bond for any sealants and a cleaner finish for your home. We take pride in our "zero mess" policy, but clearing away pre-existing grime helps us deliver that promise efficiently.
Washing Down Walls and Decking
Soft-wash the installation area at least 24 hours before our team arrives. This allows enough time for porous surfaces like timber or sandstone to dry completely. We don't recommend installing tracks on damp or slippery walls. Pay close attention to the base of your posts. Remove any moss, algae, or lichen from pavers where the bottom rail will sit. A clean, dry surface ensures the weather seal makes full contact with the ground, keeping wind and rain out of your alfresco area.
Leveling the Ground and Checking Clearances
Leveling the ground is another vital part of how to prepare your home for outdoor blind installation. Our zip blinds are designed for high performance, but they require a relatively level base to create a total seal. If your decking has a significant slope or your pavers are uneven, the bottom bar might leave gaps. Identify these areas early. In some cases, we use "build-outs" or U-channels to compensate for uneven walls, but the ground clearance remains your responsibility.
- Prune any overgrown foliage, vines, or creepers that could snag the moving blind fabric.
- Ensure there are no protruding nails or screws on the mounting posts from previous fixtures.
- Double-check that the ground is clear of loose gravel or debris that could interfere with the bottom rail.
Proper surface preparation guarantees that your new blinds operate smoothly for years to come. If you've completed your cleaning and are ready for the final step, get your outdoor zip blinds installed by the pros today.
Installation Day: Working with the Aussie Zip Blinds Team
The final step of your journey is where our expertise meets your preparation. You've followed every step of how to prepare your home for outdoor blind installation, from structural checks to surface cleaning. Now, the "Aussie Advantage" comes to life. Our factory-direct installers arrive with your custom-made blinds, ready to transform your alfresco space. Because we manufacture what we install, our team understands the exact tension requirements and mounting nuances of your specific product. There are no middlemen and no third-party contractors. Just direct, expert service that delivers tangible results.
Before the first screw goes in, our team performs a final verification. We check the measurements against your original quote and confirm the fabric colour and density. This ensures the high-performance material you selected is exactly what you receive. To understand how this professional installation protects your property value, refer to our guide on the cost of outdoor blinds in Melbourne. Proper installation is the key to long-term value retention and functional excellence in your home.
The Final Walkthrough and Operation Demo
Once the installation is complete, we don't just pack up and leave. A thorough handover is essential for your long-term satisfaction. We test the "zip" functionality in your presence to ensure the fabric glides smoothly without bunching or catching in the tracks. For motorised units, our installers set the precise "limits" on your remote control. This prevents the motor from over-extending and ensures the blind stops exactly where it should every time.
- Test the remote or manual crank for ease of use.
- Confirm the bottom rail creates a tight seal against the ground.
- Learn how to clean the fabric using only approved methods.
- Understand the wind-rating limits for your specific installation.
Maintenance is the final part of the demo. We show you how to clean the fabric without using harsh chemicals. Using unapproved cleaners or high-pressure washers can damage the weave and void your 10-year warranty. We want your blinds to look as good in year ten as they do on day one.
Next Steps and Ongoing Support
Your relationship with us doesn't end when the truck pulls away. We provide digital manuals and warranty certificates for your records. These documents outline the durability of your zip blinds and provide clear instructions for care. If you have questions later or want to automate additional areas of your home, you can easily contact Aussie Zip Blinds for direct support.
Knowing how to prepare your home for outdoor blind installation makes the entire process efficient and rewarding. You've invested in a premium product; we ensure it's installed to a premium standard. Enjoy your new, protected outdoor living space with the peace of mind that comes from a job done right.
Secure Your Perfect Outdoor Space Today
Preparation is the bridge between a good product and a perfect installation. By checking your structural stability and clearing the workspace, you ensure our team can work with maximum efficiency. You now know exactly how to prepare your home for outdoor blind installation to avoid delays and protect your investment. From coordinating with your electrician to soft-washing your mounting surfaces, these steps guarantee a result that works perfectly from day one.
We take pride in delivering 100% Australian Made quality directly to your door. Our direct-to-consumer pricing means you get premium value without the middleman markup. Every installation is backed by our comprehensive 10-year warranty, giving you total security and comfort for years to come. Your dream alfresco area is just one step away. Don't leave your comfort to chance when expert help is available.
Book Your Free Measure & Quote with Aussie Zip Blinds Today
Take the guesswork out of your home improvement. We look forward to helping you create a safe, stylish, and usable living space that you'll love every single day. Our team is ready to deliver the results you deserve.
Frequently Asked Questions
Do I need to be home for the entire outdoor blind installation?
You should be present for the start of the installation and the final handover walkthrough. Being home at the beginning allows you to confirm the exact placement and verify your fabric choices before work starts. At the end, our team provides a full demonstration of the operation and maintenance. If you've opted for motorised zip blinds, you'll need to be there to learn how to set the remote limits and smart home controls.
How long does a typical zip blind installation take?
A standard installation typically takes between two and four hours per blind. This timeframe depends on the mounting surface and whether you've chosen motorised or manual operation. Complex structural requirements or multiple units may extend the day. We aim for efficiency to minimise disruption to your routine. Our factory-direct team works quickly to ensure your new outdoor space is ready for use by the afternoon.
What happens if it rains on the day of my installation?
We can usually proceed in light rain, but heavy downpours or high winds require a reschedule. Safety is our priority when handling large aluminium headboxes and power tools on ladders. If the weather looks dangerous, we'll contact you early to find the next available slot. This ensures the structural integrity of the install isn't compromised by slippery surfaces or moisture getting into motorised components.
Do I need to hire an electrician for motorised outdoor blinds?
You must hire a licensed electrician if you don't already have a weather-rated external power point. Learning how to prepare your home for outdoor blind installation includes having your power source ready before we arrive. Our installers handle the physical mounting and plug-and-play connection. However, any new wiring or GPO installation must be completed by a professional to comply with Australian safety standards and protect your 10-year warranty.
Will the installers move my heavy outdoor furniture for me?
Our installers cannot move heavy furniture, BBQs, or fragile items for you. To maintain our schedule and prevent accidental damage to your property, the 2-metre "clear zone" must be established before we arrive. This is a vital part of how to prepare your home for outdoor blind installation. If the area isn't clear, it can lead to delays or the need to reschedule your booking.
Can zip blinds be installed onto a metal pergola or only timber?
Zip blinds are compatible with both timber and metal pergolas, including powder-coated aluminium structures. We use specialized fasteners designed for each material to ensure a high-tension, secure fit. During your initial measure, we assess the thickness and stability of your metal posts. As long as the structure is stable and anchored correctly, our tracks will provide a seamless, wind-resistant finish that matches your existing architecture perfectly.
How do I prepare my deck if it has an uneven surface?
Ensure your deck is clear of debris and identify any significant slopes before installation day. While our systems can accommodate minor variances using U-channels or build-outs, a level surface provides the best weather seal. If your pavers or decking boards are severely uneven, the bottom rail may not close perfectly. Address loose boards or protruding nails now to ensure the tracks sit flush against the posts for a professional finish.
What should I do if I have existing blinds that need removing?
You should remove any old blinds and hardware before our team arrives unless removal was specifically included in your written quote. Clearing the mounting surfaces of old brackets and screws allows our team to start work immediately. It also gives you a chance to inspect the posts for rot or damage that might need repair. A clean, bare surface is essential for the precision required by modern zip-track systems.
Disclaimer
All articles are generated and written from various sources and try to reflect all information from experience and knowledge, as well as information collected from the internet.